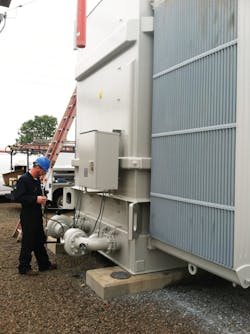
The United Illuminating Co. (UI) regards the repair of oil and SF6 leaks as a critical component in its apparatus maintenance program. When a new leak is identified and immediate regasketing or replacement is not feasible, a temporary solution is scheduled to stop the leak. More than 10 years ago, UI began using outside specialists to seal oil leaks in its transformers and circuit breakers.
Previously, a special epoxy mixture was used to seal leaks at seams, pin holes, cracks and pipe connections. This option was easy to perform and inexpensive. However, the results were inconsistent. With proper preparation, the epoxy repairs were effective about 50% of the time. In addition, removal of the epoxy for regasketing or replacement was extremely labor intensive. The utility’s fleet was aging, and UI engineers were interested in a better solution.
The utility had an initial experience with an outside contractor to repair a leaking circuit breaker that was going to be removed from service soon. As a test case, UI tested a leak repair technique as a temporary fix. The intent was to get by until the unit was changed out. The contractor used a flexible sealant material that had advantages over epoxy and was more effective in sealing the leak. The results were good, and UI has used the outside contractor approach elsewhere. The time and total cost savings were substantial.
Leaks Are Serious
Oil leaks need to be taken seriously and addressed with a proactive and ongoing maintenance program. The major issues addressed with leak repair are as follows:
- Environmental issues. Some of UI’s substations are located adjacent to the Long Island Sound, streams or wetlands; therefore, environmental impact absolutely must be avoided and cleanup costs kept to a minimum.
- Public perception. In reality, leaks may be contained and not be an environmental concern. But, if they are visible to the public, perception becomes an issue.
- Equipment outages. The extended outages required for conventional repairs are often difficult to obtain. Leak repairs can be done in areas with limited access and require shorter outage durations. In many instances, repairs can be made with the equipment energized.
- Resource availability. Resources are limited, whether people, time or money, and UI needs to maximize these resources. Additionally, staffing levels are influenced by the state of Connecticut’s Public Utilities Regulatory Authority.
- Replacement parts. As with any aging infrastructure, original equipment parts are often scarce, difficult to locate, expensive or simply no longer available.
- Delivery times. Along with the availability issue, parts that are available or need to be custom manufactured often have long lead times.
Leak Repair Benefits
Leaks do not get better over time. UI has learned that leak repair solutions can be the right fit for certain situations because of the following benefits:
- Minimal outage, if needed at all
- Can often repair leaks within 1 hour
- No need to drain oil
- Reduces manpower needs
- Generally requires only a single safety observer
- Frees up personnel to work on capital projects
- Does not require replacement parts
- Immediate cost savings
- Can schedule the work almost immediately.
Cost Considerations
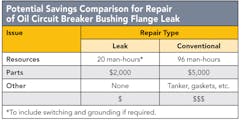
Oil leak sealing is not thought of as a permanent repair; it is a temporary patch until permanent repairs can be scheduled. Poor performers are known, whether by manufacturer, vintage or design, and are regularly inspected for problems. It really comes down to the financial analysis. In some cases, it can cost US$20,000 to filter the oil and another $20,000 to regasket properly. The leak repair alternative costs from $3,000 to $10,000. The interim fix must be considered.
Leak Seal Process
For more than seven years, UI has worked closely with The Colt Group in a proactive leak repair program. It began as an intensive series of repairs at multiple sites. It has matured into a more limited but ongoing inspection and maintenance routine. Some of The Colt Group’s repairs have become long-term solutions unintentionally, while other repairs were short-term fixes until UI could properly schedule and complete permanent repairs. Although the repairs are guaranteed for two years, many are still in place and working effectively several years later.
Over the years, UI has called on The Colt Group to make a variety of leak repairs to both transformers and circuit breakers. Two different methodologies are used, either a drill and tap using injection valves, or custom-fabricated clamps or enclosures. The drill-and-tap technique is used for oil leaks, while clamps or enclosures are used for certain oil leak applications, or for SF6 or nitrogen leaks.
The sealant used in these methods is not an epoxy. Flexible and easily removed, the sealant is specially formulated for use with high-voltage electrical apparatus. It maintains a memory that allows for expansion and contraction as needed, as a result of temperature changes and vibration. The substance has excellent dielectric properties as documented by test results from an independent laboratory.
Drill and Tap
In the drill-and-tap method, an experienced technician drills and taps a 1/16-inch (1.6-mm) blind hole in between the bolt holes to intersect the groove or gasket. (A blind hole does not completely penetrate, stopping short of the opposite side of the work space.) Next, an injector valve is installed into the tapped hole. This injector valve allows the technician to control any oil flow that may occur during the next step. Using a 1/8-inch (3.2-mm) drill bit, the technician will then drill a hole through the injector valve to penetrate the seal area.
The injector valve is then turned to the closed position. This process is repeated with additional injection sites and valves; the objective with the multiple ports is to carefully control the amount of sealant injected.
This is highly specialized work performed by technicians with years of experience. They have the expertise to know exactly where to drill, how deep to go and how much sealant to inject. Think of it as injecting a gasket from the outside in. With this noninvasive process, the oil does not need to be drained. Depending on the location of the leak, some of these repairs can be made with the unit energized. An example of a common in-service leak repair might be the bottom of a tap-changer flange or lower radiator flanges.
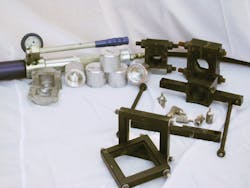
A two-part compound, the sealant has the consistency of peanut butter when first mixed. It is injected into the positioned valves one by one, using a manually controlled gun with pressure gauge. It takes approximately 1 hour for the sealant to cure. Once the sealant has cured, the injection valves are removed and Teflon-coated pipe plugs are inserted in the threaded holes.
On repairs that have a grooved or recessed area where the O-ring or gasket is located, that is a perfect spot to penetrate using the drill-and-tap technique. By intersecting this grooved area, there is a channel where the sealant can travel around and create a seal. This process can be used on tap-changer handles, tap-changer flanges, cover plates, belly bands, bushing mounting flanges and other locations.
Clamp or Enclosure
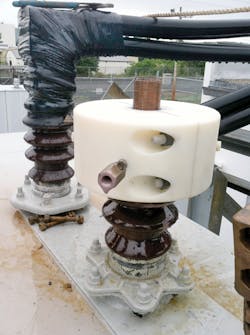
The second leak repair methodology is a custom-fabricated clamp or enclosure. This creates a barrier around the leaking component by injecting the cavity of that piece of hardware to obtain a seal. This special hardware allows the sealant to be injected under pressure to successfully seal the leaks.
For enclosure repairs, two brief outages may be required. On the morning of day one, a 1-hour outage may be required for the leak seal technician to take precise measurements for the enclosure. The device can be fabricated that same day and delivered overnight. If required, a second outage of 4 hours to 6 hours is taken to install the enclosure. Sealant is injected into a channel inside the clamp to seal the leak. The clamp remains in place and can be removed easily when needed.
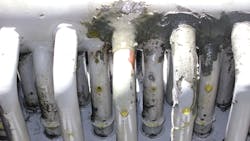
Many leak repair jobs are unique. In addition to the drill-and-tap method and the custom clamp or enclosure method, sometimes a weir can be fabricated and filled with sealant to seal leaks at the base of radiator fins or cooling rods. This somewhat decreases the cooling capacity but can be an effective short-term solution until a replacement is possible.
Substantial Savings
This is a proven process. UI and The Colt Group work closely together to seal any new leaks that develop while monitoring past repairs. Some leak repairs considered temporary fixes years ago are still holding well. The overall situation is greatly improved and under tight control. UI estimates significant savings in annual maintenance costs by using leak repair as an integral part of its overall maintenance strategy and reducing the need for regasketing and replacement.
Jon Allen ([email protected]) is lead engineer of system maintenance at The United Illuminating Co., focusing on power transformers, oil testing and relay maintenance programs. He also supports field crews with testing and repairs, and provides input into design specifications for new power transformers and substation improvement projects. Previously, Allen worked for Buck Scientific in Norwalk, Connecticut, U.S., as a field engineer and production manager for analytical instrumentation development, manufacturing, technical support and training. He holds a BSEE degree from the University of Bridgeport.
Anthony J. Picagli (t[email protected]) is a principal electric system maintenance engineer at The United Illuminating Co., focusing on circuit breakers of all classes, gas-insulated substations and standby battery systems. He is a 35-year member of the IEEE, a member of the IEEE Standards Association and active on several Doble committees. He holds both a BSEE degree and a MBA degree from The University of New Haven and is a registered professional engineer in Connecticut.
Companies mentioned:
The Colt Group | www.coltpowerservices.com
Public Utilities Regulatory Authority | www.ct.gov/pura
Risk Management Int’l | [email protected]
Sidebar: The Case for Leak Repair
By Richard K. Ladroga, Risk Management International
If oil is leaking out, air and moisture can and often do get inside transformers. Moisture can migrate into transformers through several methods. One of the most common is through aged, leaking gaskets. Even though a transformer is at positive pressure, capillary action can draw moisture and air into a transformer, even when it is leaking oil.
Rapid pressure changes attributed to cold weather operation and sudden removal from service (a transformer switched out or de-energized) can increase the rate at which water is introduced into the transformer. Wherever oil is seen leaking from a transformer, the leaks should be repaired so moisture and oxygen cannot infiltrate the unit through those areas.
